공부하면서 작성한 글이라 잘못된 부분이 있을 수 있습니다. 잘못된 부분을 발견하시면 댓글 부탁드립니다!
이 글의 예시는 Kotlin과 Spring Boot 3.5.5를 기준으로 작성되었습니다.
의문 상황
@Transactional과 @Cacheable을 같이 사용하게 될 때, 캐시된 데이터가 있는 경우 DB에 접근하지 않고 그대로 반환하기를 기대한다. 우선, 다음과 같이 @Cacheable과 @Transactional이 있는 getBook 메서드가 있다고 가정해보자.
실제 코드는 깃허브 레포지토리를 통해 확인할 수 있다.
package io.github.alstn113.anno

import org.springframework.boot.autoconfigure.SpringBootApplication
import org.springframework.boot.runApplication

@SpringBootApplication
class Application

fun main(args: Array<String>) {
    runApplication<Application>(*args)
}
package io.github.alstn113.anno.config
import org.springframework.cache.annotation.EnableCaching
import org.springframework.context.annotation.Configuration
@Configuration
@EnableCaching
class CacheConfigpackage io.github.alstn113.anno.core
import org.springframework.cache.annotation.Cacheable
import org.springframework.data.repository.findByIdOrNull
import org.springframework.stereotype.Service
import org.springframework.transaction.annotation.Transactional
@Service
class BookService(
private val bookRepository: BookRepository,
) {
@Cacheable("books", key = "#id")
@Transactional(readOnly = true)
fun getBook(id: Long): BookDto {
val book = bookRepository.findByIdOrNull(id)
?: throw IllegalArgumentException()
return BookDto(id = book.id, title = book.title)
}
@Transactional
fun createBook(title: String): Long {
val book = Book(title = title)
val savedBook = bookRepository.save(book)
return savedBook.id
}
}getBook 메서드는 캐시된 데이터가 없는 경우 DB에서 데이터를 읽어오고, 캐시된 데이터가 있는 경우 캐시된 데이터를 응답하도록 작성했다.
// test/kotlin/io/github/alstn113/anno/AnnotationTests.kt

package io.github.alstn113.anno

import io.github.alstn113.anno.core.BookService
import org.junit.jupiter.api.Test
import org.slf4j.Logger
import org.slf4j.LoggerFactory
import org.springframework.boot.test.context.SpringBootTest
import org.springframework.test.context.TestConstructor

@SpringBootTest
@TestConstructor(autowireMode = TestConstructor.AutowireMode.ALL)
class AnnotationTests(
    private val bookService: BookService
) {

    val log: Logger = LoggerFactory.getLogger(javaClass)

    @Test
    fun testAnnotation() {
        val bookId = bookService.createBook("Spring")

        log.info("⭐--- no caching start")
        bookService.getBook(bookId)
        log.info("⭐--- no caching end")

        log.info("⛅--- caching start")
        bookService.getBook(bookId)
        log.info("⛅--- caching end")
    }
}
# application.yml
logging:
level:
org.springframework.context: TRACE
org.springframework.cache.interceptor: TRACE
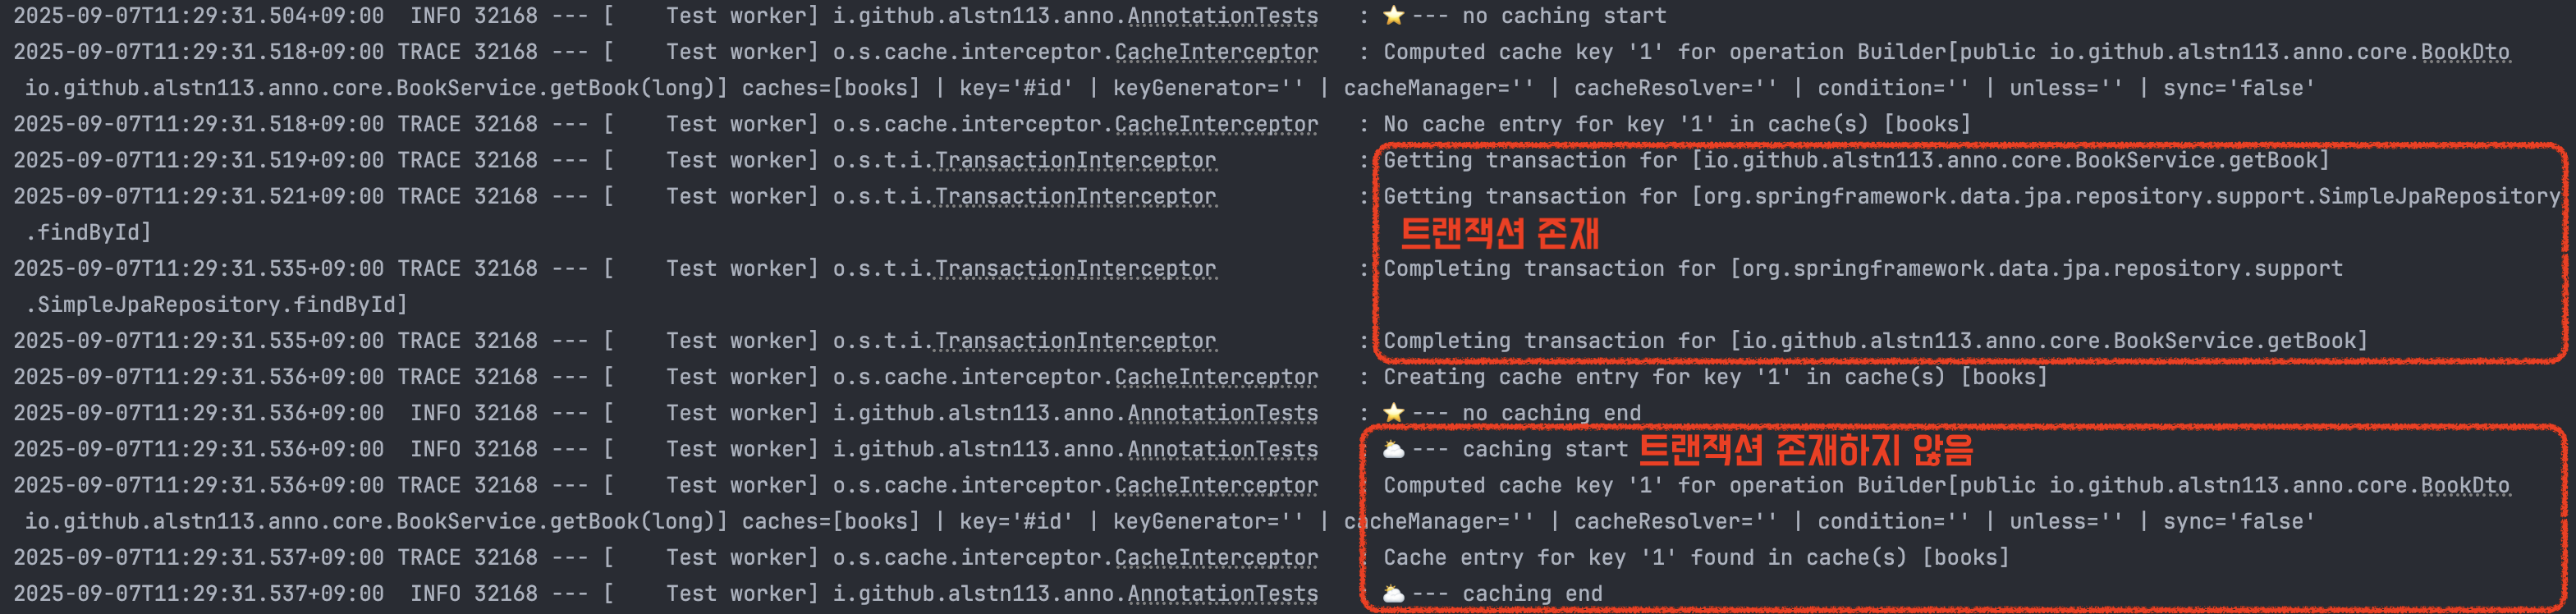
org.springframework.transaction.interceptor: TRACEAnnotationTests 실행 결과를 확인하면 첫 번째 getBook 메서드 실행 시에는 트랜잭션이 존재하고, 두 번째 getBook 메서드 실행 시에는 트랜잭션 없이 캐시된 데이터를 반환하는 것을 알 수 있다. 또한, 첫 번째 메서드에서 트랜잭션을 시작하기 전에 캐시를 먼저 확인하는 것을 알 수 있다.
어떤 이유로 @Cacheable이 @Transactional보다 먼저 실행된걸까? @Cacheable이 @Transactional보다 위에 작성되어서 그런걸까? 두 어노테이션의 순서를 변경해도 동일한 결과를 얻을 수 있다.
Spring 실행 과정부터 어노테이션 작동 원리까지 파악해보면서 그 이유를 알아보자!
Spring 실행 과정
Spring Boot 프로젝트를 생성하면 main 메서드가 생성되고 runApplication이라는 정적 메서드를 통해서 실행할 수 있다.
package io.github.alstn113.anno

import org.springframework.boot.autoconfigure.SpringBootApplication
import org.springframework.boot.runApplication

@SpringBootApplication
class Application

fun main(args: Array<String>) {
    runApplication<Application>(*args)
}
runApplication을 내부를 계속 탐색하다보면 run 메서드를 찾을 수 있다. run 메서드는 ApplicationContext를 생성하고 초기화한 후 반환한다.
package org.springframework.boot;

public class SpringApplication {
    ...
    public ConfigurableApplicationContext run(String... args) {
        Startup startup = Startup.create();
        if (this.properties.isRegisterShutdownHook()) {
            SpringApplication.shutdownHook.enableShutdownHookAddition();
        }
        DefaultBootstrapContext bootstrapContext = createBootstrapContext();
        ConfigurableApplicationContext context = null;
        configureHeadlessProperty();
        SpringApplicationRunListeners listeners = getRunListeners(args);
        listeners.starting(bootstrapContext, this.mainApplicationClass);
        try {
            ApplicationArguments applicationArguments = new DefaultApplicationArguments(args);
            ConfigurableEnvironment environment = prepareEnvironment(listeners, bootstrapContext, applicationArguments);
            Banner printedBanner = printBanner(environment);
            context = createApplicationContext(); // (1)
            context.setApplicationStartup(this.applicationStartup);
            prepareContext(bootstrapContext, context, environment, listeners, applicationArguments, printedBanner);
            refreshContext(context); // (2)
            afterRefresh(context, applicationArguments);
            startup.started();
            if (this.properties.isLogStartupInfo()) {
                new StartupInfoLogger(this.mainApplicationClass, environment).logStarted(getApplicationLog(), startup);
            }
            listeners.started(context, startup.timeTakenToStarted());
            callRunners(context, applicationArguments);
        }
        catch (Throwable ex) {
            throw handleRunFailure(context, ex, listeners);
        }
        try {
            if (context.isRunning()) {
                listeners.ready(context, startup.ready());
            }
        }
        catch (Throwable ex) {
            throw handleRunFailure(context, ex, null);
        }
        return context;
    }
    ...
}
코드를 보면 알 수 있듯이 굉장히 방대한 내용이 담겨있다. 간단하게 설명하기 위해서 createApplicationContext, refreshContext 부분만 설명하겠다.
createApplicationContext
createApplicationContext에서는 ApplicationContext를 생성한다. ApplicationContext는 빈을 관리하는 핵심 컨테이너로 가장 기본적인 빈 관리 기능만 제공하는 BeanFactory를 상속하여, 애플리케이션 개발에 필요한 다양한 편의 기능을 추가한 것이다. createApplicationContext에서는 이전 과정에서 얻은 애플리케이션 타입을 바탕으로 구현체를 결정하게 된다. 일반적인 웹 개발환경에서는 AnnotationConfigServletWebServerApplicationContext이 생성된다. createApplicationContext 단계에서는 빈을 담을 그릇을 만드는 과정으로, 아직 빈들이 초기화되거나 등록되지 않은 상태이다.
refreshContext
refeshContext는 스프링 컨테이너 생명주기에서 가장 중요한 단계로 다음과 과정을 수행한다.
- 빈 정의 로딩: @ComponentScan과 @EnableAutoConfiguration이 동작하여 애플리케이션에 필요한 빈 정의(Bean Definition)를 로드하고 등록한다. 이 빈 정의는 빈을 생성하기 위한 설계도 역할을 한다.
- 빈 후처리기 등록: 빈 정의가 로딩된 후, 빈 후처리기(BeanPostProcessor)를 컨테이너에 등록한다. 이 후처리기는 빈 객체가 생성된 후 초기화 과정에서에서 특별한 로직을 추가하는 역할을 한다.
- 빈 생성 및 후처리기 적용: 등록된 빈 정의를 바탕으로 실제 빈 객체를 생성하고, 의존성을 주입한다. 이 때 등록된 빈 후처리기가 동작하여 @Transactional이나 @Cacheable과 같은 AOP Proxy를 빈에 적용하는 등 필요한 기능을 부여한다.
refreshContext 내부를 탐색하다보면 refresh 메서드를 확인할 수 있다.
package org.springframework.context.support;

public abstract class AbstractApplicationContext extends DefaultResourceLoader implements ConfigurableApplicationContext {
    ...
    @Override
    public void refresh() throws BeansException, IllegalStateException {
        this.startupShutdownLock.lock();
        try {
            this.startupShutdownThread = Thread.currentThread();

            StartupStep contextRefresh = this.applicationStartup.start("spring.context.refresh");

            // Prepare this context for refreshing.
            prepareRefresh();

            // Tell the subclass to refresh the internal bean factory.
            ConfigurableListableBeanFactory beanFactory = obtainFreshBeanFactory();

            // Prepare the bean factory for use in this context.
            prepareBeanFactory(beanFactory);

            try {
                // Allows post-processing of the bean factory in context subclasses.
                postProcessBeanFactory(beanFactory);

                StartupStep beanPostProcess = this.applicationStartup.start("spring.context.beans.post-process");
                // Invoke factory processors registered as beans in the context.
                invokeBeanFactoryPostProcessors(beanFactory); // (1)
                // Register bean processors that intercept bean creation.
                registerBeanPostProcessors(beanFactory); // (2)
                beanPostProcess.end();

                // Initialize message source for this context.
                initMessageSource();

                // Initialize event multicaster for this context.
                initApplicationEventMulticaster();

                // Initialize other special beans in specific context subclasses.
                onRefresh();

                // Check for listener beans and register them.
                registerListeners();

                // Instantiate all remaining (non-lazy-init) singletons.
                finishBeanFactoryInitialization(beanFactory); // (3)

                // Last step: publish corresponding event.
                finishRefresh();
            }

            catch (RuntimeException | Error ex ) {
                if (logger.isWarnEnabled()) {
                    logger.warn("Exception encountered during context initialization - " +
                            "cancelling refresh attempt: " + ex);
                }

                // Destroy already created singletons to avoid dangling resources.
                destroyBeans();

                // Reset 'active' flag.
                cancelRefresh(ex);

                // Propagate exception to caller.
                throw ex;
            }

            finally {
                contextRefresh.end();
            }
        }
        finally {
            this.startupShutdownThread = null;
            this.startupShutdownLock.unlock();
        }
    }
    ...
}
이 또한, 굉장히 방대한 내용이 담겨있으므로 중요한 부분인 invokeBeanFactoryPostProcessors, registerBeanPostProcessors, finishBeanFactoryInitialization만 확인하겠다.
invokeBeanFactoryPostProcessors
이 단계에서는 핵심 역할은 BeanDefinitionRegistryPostProcessor(특히 ConfigurationClassPostProcessor)를 실행하여 사용자 구성들을 분석해 BeanDefinition을 등록하고, 그 후 지연 처리되는 @EnableAutoConfiguration을 통해 자동 구성 클래스를 마지막에 가져와 평가 후 빈 정의를 추가 등록하는 것이다. 이를 이해하기 위해서 먼저 @SpringBootApplication을 알아보자.

@SpringBootApplication 중 주의깊게 볼 부분은 @SpringBootConfiguration, @EnableAutoConfiguration, @ComponentScan이다.
@SpringBootConfiguration은 @Configuration과 거의 동일하고, 기준점의 역할을 한다.
@EnableAutoConfiguration은 클래스패스에 있는 라이브러리들을 기반으로 자동 설정 빈을 생성하는 기능을 활성화한다. 아래의 경로에서 자동 구성되는 클래스들의 목록을 확인할 수 있다.
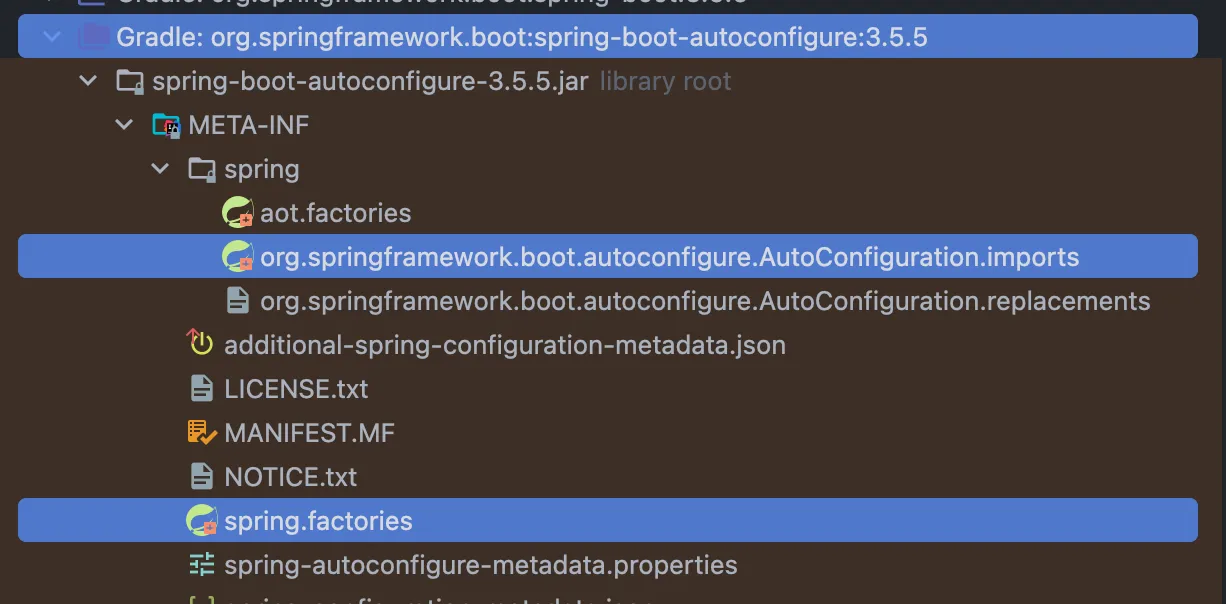
package org.springframework.boot.autoconfigure;

@Target(ElementType.TYPE)
@Retention(RetentionPolicy.RUNTIME)
@Documented
@Inherited
@AutoConfigurationPackage
@Import(AutoConfigurationImportSelector.class) // <-
public @interface EnableAutoConfiguration { ... }
@EableAutoConfiguration에는 @Import(AutoConfigurationImportSelector.class)가 있다. 이를 통해 정의된 클래스를 들을 불러올 수 있다.
package org.springframework.boot.autoconfigure;

public class AutoConfigurationImportSelector implements DeferredImportSelector, // <-
	BeanClassLoaderAware, ResourceLoaderAware, BeanFactoryAware, EnvironmentAware, Ordered { ... }
AutoConfigurationImportSelector는 DeferredImportSelector를 구현하고 있다. DeferredImportSelector의 경우 ConfigurationClassParser에서 다른 설정 클래스가 모두 완료된 후 처리되게 지연시킨다.
@ComponentScan은 해당 패키지와 하위 패키지들을 대상으로 @Component(@Controller, @Service, @Repository, @Configuration 등), @Configuration 내부의 @Bean 등을 자동으로 탐지하여 빈 정의를 등록하도록 돕는다.
다시 돌아와서 정리해보자. ConfigurationClassPostProcessor는 @ComponentScan으로 컴포넌트를 찾고, @Import는 즉시 처리하며 @Bean 메서드를 수집한다. 각 파싱이 끝나면 @DeferredImportSelector를 처리해 자동설정을 추가하고, @ConditionalOnClass, @ConditionalOnMissionBean 같은 조건을 평가하면서 실제 빈 정의를 등록한다. 이 과정에서 새롭게 추가된 구성 후보가 생기면 같은 절차를 반복한다.
registerBeanPostProcessors
이 단계에서는 BeanPostProcessors 타입의 빈 정의를 찾아서 순서에 맞게 인스턴스화하고 BeanFactory에 등록한다. 이 때 아직 일반 빈은 만들지 않고 오직 빈 후처리기(BeanPostProcessors)들만 등록한다.
finishBeanFactoryInitialization
finishBeanFactoryInitialization에서는 모든 싱글톤 빈을 만들고 빈 후처리기를 적용하여 Proxy 객체를 생성한 후 컨테이너에 등록한다.
Proxy 적용 과정
지금까지 Spring이 어떻게 실행되는지 알아봤다. 이제 @Transactional과 @Cacheable이 어떻게 Proxy를 적용하게 하는지 알아보자.
@Cacheable
캐시를 사용하기 위해서는 @EnableCaching을 등록해야 하기 때문에 CacheConfig를 작성했었다. @EnableCaching을 탐색해보자.
package org.springframework.cache.annotation;

@Target(ElementType.TYPE)
@Retention(RetentionPolicy.RUNTIME)
@Documented
@Import(CachingConfigurationSelector.class)
public @interface EnableCaching { ... }
@EnableCaching은 @Import를 통해서 CachingConfigurationSelector를 불러온다. 이는 내부적으로 ProxyCachingConfiguration을 등록하게 된다.
package org.springframework.cache.annotation;

@Configuration(proxyBeanMethods = false)
@Role(BeanDefinition.ROLE_INFRASTRUCTURE)
public class ProxyCachingConfiguration extends AbstractCachingConfiguration {

	@Bean(name = CacheManagementConfigUtils.CACHE_ADVISOR_BEAN_NAME)
	@Role(BeanDefinition.ROLE_INFRASTRUCTURE)
	public BeanFactoryCacheOperationSourceAdvisor cacheAdvisor(
			CacheOperationSource cacheOperationSource, CacheInterceptor cacheInterceptor) {

		BeanFactoryCacheOperationSourceAdvisor advisor = new BeanFactoryCacheOperationSourceAdvisor();
		advisor.setCacheOperationSource(cacheOperationSource);
		advisor.setAdvice(cacheInterceptor);
		if (this.enableCaching != null) {
			advisor.setOrder(this.enableCaching.<Integer>getNumber("order"));
		}
		return advisor;
	}

	@Bean
	@Role(BeanDefinition.ROLE_INFRASTRUCTURE)
	public CacheOperationSource cacheOperationSource() {
		// Accept protected @Cacheable etc methods on CGLIB proxies, as of 6.0.
		return new AnnotationCacheOperationSource(false);
	}

	@Bean
	@Role(BeanDefinition.ROLE_INFRASTRUCTURE)
	public CacheInterceptor cacheInterceptor(CacheOperationSource cacheOperationSource) {
		CacheInterceptor interceptor = new CacheInterceptor();
		interceptor.configure(this.errorHandler, this.keyGenerator, this.cacheResolver, this.cacheManager);
		interceptor.setCacheOperationSource(cacheOperationSource);
		return interceptor;
	}

}
ProxyCachingConfiguration 클래스 아래에는 MethodInterceptor(org.aopalliance.intercept)를 구현한 CacheInterceptor가 있다. 제일 상단에는 Advisor를 구현한 BeanFactoryCacheOperationSourceAdvisor를 빈으로 등록하고 있다. Advisor의 순서는 @EnableCaching의 order 값을 사용함을 알 수 있다.
Spring AOP에 대해서 잘 알지 못한다면 김영한님의 "스프링 핵심 원리 - 고급편" 강의를 추천한다.
AnnotationAwareAspectJAutoProxyCreator
위에서 생성된 Advisor를 등록하기 위해서는 빈 후처리기를 등록해야한다. 스프링 부트 자동 설정으로 AnnotationAwareAspectJAutoProxyCreator라는 빈 후처리기가 자동으로 등록된다.
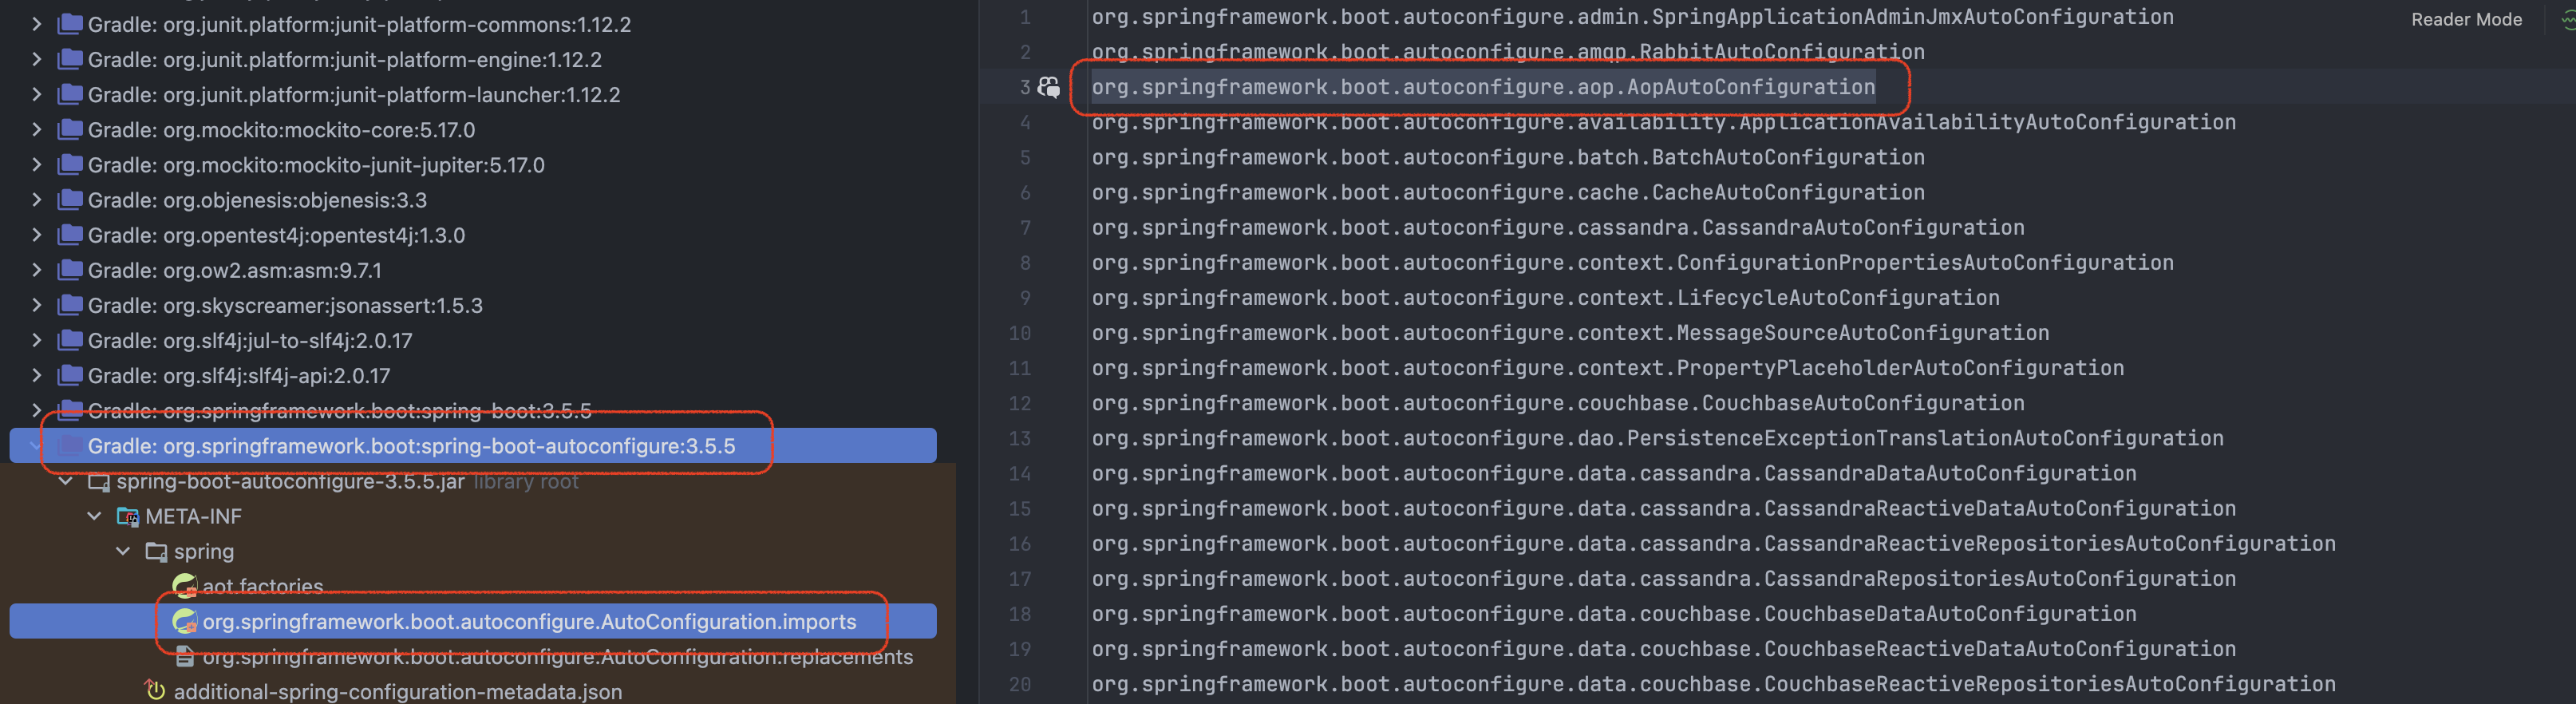
@EnableAutoConfiguration에 의해서 AopAutoConfiguration이 등록된다. AopAutoConfiguration > @EnableAspectJAutoProxy > @Import(AspectJAutoProxyRegistrar.class) > registerAspectJAnnotationAutoProxyCreator 관련 메서드들을 타고 들어가서 AnnotationAwareAspectJAutoProxyCreator 빈 후처리기를 등록하게 된다. 이를 통해서 Advisor를 적용하기 위해 빈 후처리기를 따로 등록하지 않아도 된다.
참고로, Advisor마다 Proxy를 만들지 않는다. 최적화를 위해서 하나의 Proxy에 여러 Advisor들이 적용된다. 즉, 하나의 메서드에 여러 AOP가 동시에 적용되어도, 하나의 Proxy만 생성된다. 클래스 내 여러 메서드 중 여러 AOP가 동시에 적용되나 하나만 적용되나 Proxy 클래스는 하나만 생성된다.
@Transactional
@EnableAutoConfiguration에 의해서 TransactionAutoConfiguration이 등록된다.
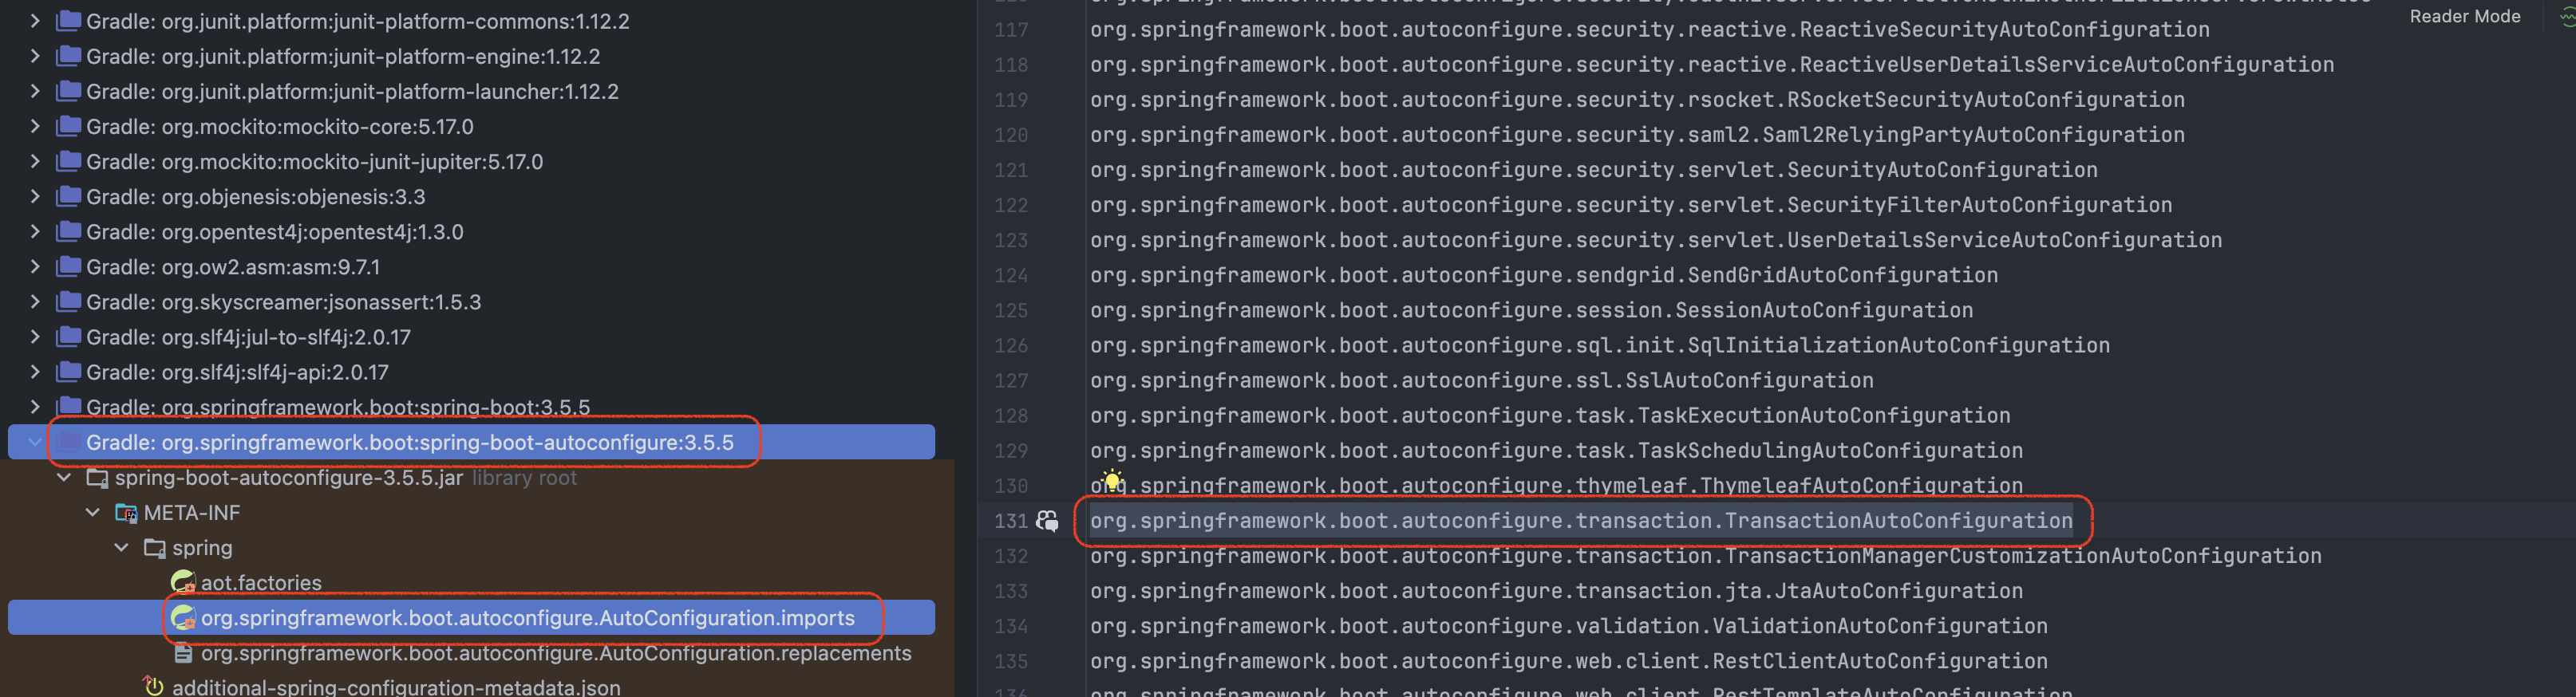
package org.springframework.boot.autoconfigure.transaction;

@AutoConfiguration
@ConditionalOnClass(PlatformTransactionManager.class)
public class TransactionAutoConfiguration {

	// ...

	@Configuration(proxyBeanMethods = false)
	@ConditionalOnBean(TransactionManager.class)
	@ConditionalOnMissingBean(AbstractTransactionManagementConfiguration.class)
	public static class EnableTransactionManagementConfiguration {

		// ...

		@Configuration(proxyBeanMethods = false)
		@EnableTransactionManagement(proxyTargetClass = true) // <-
		@ConditionalOnBooleanProperty(name = "spring.aop.proxy-target-class", matchIfMissing = true)
		public static class CglibAutoProxyConfiguration {

		}
	}

	// ...
}
TransactionAutoConfiguration > CglibAutoProxyConfiguration > @EnableTransactionManagement 로 탐색할 수 있다. @EnableTransactionManagement는 @Transactional을 사용할 수 있게 활성화한다.
package org.springframework.transaction.annotation;

@Target(ElementType.TYPE)
@Retention(RetentionPolicy.RUNTIME)
@Documented
@Import(TransactionManagementConfigurationSelector.class)
public @interface EnableTransactionManagement { ... }
@EnableTransactionManagement에는 @Import(TransactionManagementConfigurationSelector)가 있고, ProxyTransactionManagementConfiguration를 등록할 수 있게 한다.
package org.springframework.transaction.annotation;

@Configuration(proxyBeanMethods = false)
@Role(BeanDefinition.ROLE_INFRASTRUCTURE)
@ImportRuntimeHints(TransactionRuntimeHints.class)
public class ProxyTransactionManagementConfiguration extends AbstractTransactionManagementConfiguration {

    @Bean(name = TransactionManagementConfigUtils.TRANSACTION_ADVISOR_BEAN_NAME)
    @Role(BeanDefinition.ROLE_INFRASTRUCTURE)
    public BeanFactoryTransactionAttributeSourceAdvisor transactionAdvisor(
          TransactionAttributeSource transactionAttributeSource, TransactionInterceptor transactionInterceptor) {

       BeanFactoryTransactionAttributeSourceAdvisor advisor = new BeanFactoryTransactionAttributeSourceAdvisor();
       advisor.setTransactionAttributeSource(transactionAttributeSource);
       advisor.setAdvice(transactionInterceptor);
       if (this.enableTx != null) {
          advisor.setOrder(this.enableTx.<Integer>getNumber("order"));
       }
       return advisor;
    }

    @Bean
    @Role(BeanDefinition.ROLE_INFRASTRUCTURE)
    public TransactionInterceptor transactionInterceptor(TransactionAttributeSource transactionAttributeSource) {
       TransactionInterceptor interceptor = new TransactionInterceptor();
       interceptor.setTransactionAttributeSource(transactionAttributeSource);
       if (this.txManager != null) {
          interceptor.setTransactionManager(this.txManager);
       }
       return interceptor;
    }

}
@EnableCaching과 유사하게 MethodInterceptor를 구현한 transactionInterceptor가 있고, Advisor를 구현한 BeanFactoryTransactionAttributeSourceAdvisor를 빈으로 등록하고 있다. Advisor의 순서는 @EnableTransactionManagement의 order를 통해 적용된다.
적용 순서
@EnableCaching은 사용자 구성이므로 먼저 등록된다. @EnableAutoConfiguration는 DeferredImportSelector에 의해서 지연 등록되므로 @EnableTransactionManagement는 더 늦게 등록된다. Advisor는 우선 order 값을 비교하여 작은 값이 먼저 실행되고, 동일하면 먼저 등록된 것이 먼저 실행된다. 예를 들어, 동일한 order 값을 가진 Cache Advisor, Transaction Advisor가 있고, Cache Advisort가 먼저 등록됐다고 가정하자. 그러면 캐시 처리 > 트랜잭션 처리 > 로직 실행 > 트랜잭션 처리 > 캐시 처리 순서로 실행된다. 이러한 이유로 @Cacheable이 @Transactional보다 먼저 실행됐던 것이다.
순서를 변경하고 싶으면 Cache Advisor와 Transaction Advisor에 있던 order 값을 수정하면된다. Cache의 경우 @EnableCaching의 order값을, Transaction의 경우, @EnableTransactionManagement의 order 값을 변경하면 된다.
package org.springframework.cache.annotation;

@Target(ElementType.TYPE)
@Retention(RetentionPolicy.RUNTIME)
@Documented
@Import(CachingConfigurationSelector.class)
public @interface EnableCaching {

	boolean proxyTargetClass() default false;

	AdviceMode mode() default AdviceMode.PROXY;

	int order() default Ordered.LOWEST_PRECEDENCE; // <-
}
@EnableCaching과 @EnableTransactionManagement의 order은 모두 "제일 우선순위가 낮음" 값으로 동일하다. 이 값을 변경하면 AOP의 우선순위를 변경할 수 있다.
그러면 두 AOP가 모두 사용자 구성으로 등록되고, 우선순위가 동일하면 어떤 것이 먼저 실행될까? 이를 테스트하기 위해서 @EnableTransactionManagement를 직접 등록해보자.
package io.github.alstn113.anno.config

import org.springframework.context.annotation.Configuration
import org.springframework.transaction.annotation.EnableTransactionManagement

@Configuration
@EnableTransactionManagement
class AopConfig
그런데 사용자 구성과 자동 구성이 겹치는 경우 어떻게 될까? Transaction Advisror가 중복되어 적용될까?
@AutoConfiguration
@ConditionalOnClass(PlatformTransactionManager.class)
public class TransactionAutoConfiguration {

    // ...

	@Configuration(proxyBeanMethods = false)
	@ConditionalOnBean(TransactionManager.class)
	@ConditionalOnMissingBean(AbstractTransactionManagementConfiguration.class) // <-
	public static class EnableTransactionManagementConfiguration {

		// ...

		@Configuration(proxyBeanMethods = false)
		@EnableTransactionManagement(proxyTargetClass = true)
		@ConditionalOnBooleanProperty(name = "spring.aop.proxy-target-class", matchIfMissing = true)
		public static class CglibAutoProxyConfiguration {

		}

	}

	// ...
}
TransactionAutoConfiguration 은 @ConditionalOnMissingBean(AbstractTransactionManagementConfiguration.class) 조건을 사용하므로, 사용자가 @EnableTransactionManagement 를 선언해 ProxyTransactionManagementConfiguration(= AbstractTransactionManagementConfiguration 하위)이 이미 등록된 경우 중복 생성을 피하기 위해 건너뛰어진다.
@EnableCaching이 있는 CacheConfig과 @EnableTransactionManagement가 있는 AopConfig 모두 사용자 구성에 의해 등록되었다. 그리고 두 어노테이션은 우선순위가 같다. 이 경우 테스트를 실행하면 트랜잭션이 캐시보다 먼저 실행된다. AopConfig 클래스 이름을 DAopConfig로 변경하면 캐시가 트랜잭션보다 먼저 실행된다. 즉, 패키지 경로가 빠른 것이 먼저 스캔되고 빨리 등록 되는 것 같다.
주의: 사용자 환경나 구현체에 따라 우선순위가 다를 수 있다.
알아두면 좋은 것
Spring은 Proxy 방식의 AOP를 사용한다. 어떤 메서드에 @Transactional과 같은 AOP 어노테이션이 적용되면, 원본 객체 대신 Proxy로 감싼 객체를 빈으로 등록한다. 메서드 호출이 외부에서 들어올 때는 이 Proxy가 먼저 동작하며, 내부에 구성된 Advisor를 실행한 뒤 실제 대상 객체 메서드를 호출한다. 아래의 예시를 보자.
@Service
class BookService(
    private val bookRepository: BookRepository,
) {

    fun external(): Book {
        return internal()
    }

    @Transactional
    fun internal(): Book {
        val book = Book(title = "Spring")
        return bookRepository.save(book)
    }
}
BookService의 internal() 메서드는 @Transactional이 붙어 있으므로 이 클래스는 Proxy 형태로 빈에 등록된다. external 메서드에서 internal 메서드를 실행하는 것과 같이 같은 인스턴스 내부에서 호출할 때 이미 Proxy 안쪽의 실제 객체에서 internal 메서드을 직접 실행하는 것이기 때문에 Proxy를 다시 경유하지 않는다. 따라서 internal 메서드에 선언된 @Transactional은 적용되지 않는다. 이 문제를 해결하기위해 @Transactional이 필요한 로직을 동일 내부에서 직접 호출하지 않도록 클래스를 분리하여 해결할 수 있다.
마치며
이번 글에서는 AOP 어노테이션의 우선순위가 어떻게 결정되는지 Spring 실행 과정과 함께 알아보았습니다. 잘못된 부분이 있다면 댓글 부탁드립니다. 감사합니다.
참고
- Mangyu님의 블로그 / SpringBoot 소스 코드 분석하기 시리즈
- atti님의 블로그 / ApplicationContext 분석 시리즈
- 김영한님의 강의 / 스프링 핵심 원리 - 고급편
'서버' 카테고리의 다른 글
| POST 요청의 중복 처리를 막는 멱등키 헤더 구현 (Interceptor + Redis) (0) | 2025.09.17 |
|---|---|
| Refresh Token과 Refresh Token Rotation에 대한 고찰 (1) | 2025.09.14 |
| Spring Security, 직접 구현하면서 이해해보자! - 3편: FilterChainProxy와 Lambda DSL (0) | 2025.05.02 |
| Spring Security, 직접 구현하면서 이해해보자! - 2편: 인증, 인가, 예외 처리 (0) | 2025.05.02 |
| Spring Security, 직접 구현하면서 이해해보자! - 1편: 아키텍처 이해 (1) | 2025.04.30 |